A paint edger is a specialized tool that is supposed to make it easier to “cut in” paint along trim moldings and where walls and ceilings meet. Most of the time, paint edgers are used to paint walls, such as above baseboards, below the crown molding, around window and door trim, and where two walls meet, such as for accent walls.
Pros rarely use paint edgers because they are usually very good at cutting in the paint with a trim brush. But for many DIYers, edging work—bringing paint to the edge of ceilings, trim, or wall junctions while keeping it sharp and avoiding drips—can be nerve-wracking and anything but fun. Paint edgers promise that you can make clean paint edges with a neat tool instead of using painter’s tape.
Table of Contents
How to Use a Paint Edger
What is an edger for paint?
Paint edgers are special tools that come in two main types: small paint pads or small paint rollers with handles that are made to run along adjacent surfaces to keep paint from getting on wood trim or an adjacent ceiling surface. Many of them have small, rotating wheels that are made to move smoothly along the surface next to them while keeping the paint applicator just a little bit away from the surface to be covered. You can use these tools instead of masking off adjacent surfaces with painter’s tape or “cutting in” by hand with a trim brush.
Paint edgers come in two types.
There is no perfect paint edger. Each paint edger has its own set of pros and cons, and a lot of how well you do with it depends on how well your skills and work style match up with the paint edger. There are two kinds of paint edgers: those with a roller and those with a pad.
Paint edgers with pads
In cheaper edgers, the paint is spread across the surface by a pad. Paint may come out of a tube, or the pad may need to be refilled from the paint can or paint tray. Spreader paint edgers are usually the least expensive type of paint edger, with some costing less than $10.
Edgers with a spreader make it easy to paint quickly, but the paint often gets smeared. Lines are unavoidable, but they can be covered up by painting over them with an edger or a brush.
Paint Edgers With Rollers
Edgers with rollers use a narrow roller cover to spread the paint. Some brands come with a metal or plastic shield to keep the paint from getting on the other side. Accubrush MX and XT are two of the most well-known paint edgers that use a roller. Even though they are more expensive, Accubrush paint edgers do a better job than pad-style edgers most of the time. After the roller does most of the work, a small edging brush that attaches to the handle can be used to smooth the paint along the edges.
Roller-type edgers are more accurate, but they take longer to use and have to be set up and cleaned up with more care.
Painters’ tape vs. paint edgers
Another common way to cut in paint is to cover trim moldings or adjacent wall surfaces with painter’s tape to keep paint from dripping onto them by accident. Many do-it-yourselfers use painter’s tape, and once you get the hang of it, it can work pretty well. Some do-it-yourselfers who try paint edgers end up going back to using painter’s tape. Paint edgers can be a little messy to use, and some do-it-yourselfers don’t think they’re worth the trouble.
But in reality, many professionals and skilled DIYers don’t use either of these methods and instead rely on their ability to cut in by hand. When done by a skilled painter, cutting in by hand looks more professional than the other two methods. But this takes time and a lot of skill with a paintbrush, which is something that not all DIYers can master.
- Edgers for paint
- Pros rarely use it.
- Can get dirty
- provides the fastest option
- Results can sometimes be wrong
- Tape for painters
- Professionals sometimes use
- Easy to use, but takes a little bit of time
- Not every time, the results are perfect.
- An option that is cheap
How to Use an Edger to Paint
The usual way to paint a room is to start with the trim moldings, then cut in the walls with an edger or trim brush, and finish with “the field.”
Using a paint edger is similar to painting on walls in a lot of ways. In particular, it’s important to “keep a wet edge”—don’t put paint on a surface where new paint has already dried. If you do this, you might get visible lap marks that will stand out. As you paint along a baseboard or other edge, you should do this. Apply the paint from where it is wet to where it is dry. This will make lap marks less likely.
Get the edger ready.
Carefully read the tool’s instructions and put it together as told. Roller-type edgers are usually a little more difficult to use. Sometimes, you have to put a small brush on the handle after you put the roller cover on.
Putting Paint on
As with regular brush or roller painting, it’s important to load the edging pad or roller with enough paint but not too much, which can make the application messy and hard to control. Pour the paint into a standard roller tray, and use this to soak the edging roller or pad. When you lift the applicator up from the tray, the paint shouldn’t drip off of it.
Begin Painting
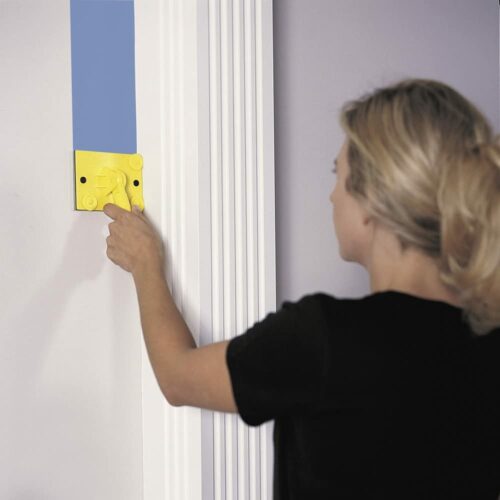
Start at one edge of the line you want to paint and move the paint edger along the line, keeping the edge of the tool tight against the molding or wall surface next to it. To get an even coat of paint, you may need to use the tool more than once.
Reload the applicator right away, and then keep going with the edging line. The best way to do this is to start the next pass while the paint is still wet, pulling the fresh paint from the wet area of the wall into the dry area. This is called “keeping a wet edge,” and it will make the lap marks on your wall less noticeable. Instead of taking breaks while painting, it’s best to finish a full line of work.
Look over and fix up
As you finish a line of edging, check the paint and, if necessary, use a trim brush to smooth out any sags, drips, or bare spots. It’s normal to miss a few spots, and even experienced painters need to fix a few things.
Re-paint where needed
It’s common to need a second coat of paint when using a roller, especially if the wall color is changing a lot. It’s best to paint the whole wall, including the field, and wait until the first coat is completely dry before starting a second coat on the cut-in lines.
How to Clean Your Paint Edger
As with any painting tool, the best way to keep your edger working for a long time is to clean it well after each use. Any dried paint that builds up on the handle or edge will quickly ruin your painting.
After each use, wash your paint edger well with soap and water. Some people like to clean the roller covers so they can use them again, while others throw them away and start each new job with a new roller cover. If you don’t clean a roller cover very well, the best results usually come from using a new one each time.